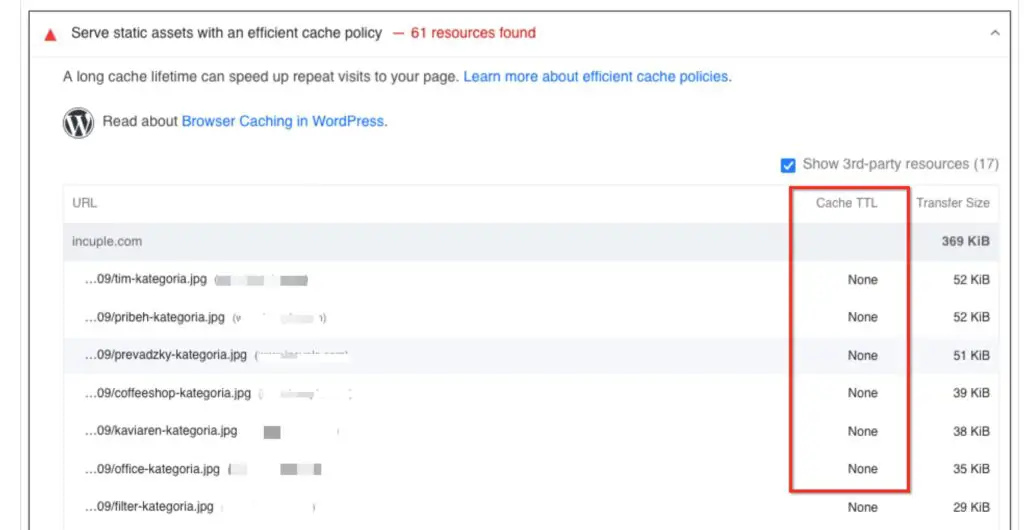
The Google PageSpeed recommendation to serve static assets with an efficient cache policy is all about browser caching. It’s usually pretty straightforward to fix on WordPress sites.
“Static assets” means the files on your site: CSS, JavaScript, images, fonts, videos (and other media files).
“Efficient cache policy” means that they have a long enough browser caching value so that they do not have to be downloaded by your site visitors frequently. Usually 4 months or longer is enough to satisfy Google and other tools.
This recommendation does not actually affect your overall score! It is a best practice to have a good browser caching policy for your site, but if it’s not “green” on your site, it won’t affect the score or Core Web Vitals.
I’ll let you know how to implement browser caching and how to troubleshoot issues.
Summary
- Browser caching is a best practice but does not affect your PageSpeed score
- This helps repeat visitors to your site
- The easiest way to implement is using a caching plugin or asking your webhost
- Cache policy can also be set at your CDN/Cloudflare
How to set up the correct cache policy
You can only control the cache policy for files that are hosted on your own domain, or your CDN. You can’t control files coming from external domains, like Facebook, Google, Pinterest etc.
The rules are either set in the htaccess file of your site, or in the server configuration files. Most commonly they are set using “Expires” or “cache-control” rules. Either is fine.
It’s usually quite easy to apply the correct caching rules with one of the below methods. I’ve also provided a troubleshooting guide for common issues later on.
Your webhost
Most good webhosts apply browser caching automatically in the server configuration. If the values aren’t long enough, according to Google, you should be able to contact your host to have them adjusted.
A caching plugin
The easiest way to set this up is to use a caching or optimization plugin like WP Rocket, Flying Press etc. They add the necessary rules to the htaccess file for you. Of course, you’ll get tons more performance benefits from these plugins besides browser caching!
Manually edit htaccess file
If the two options above aren’t to your liking, you can manually add the caching rules to the htaccess file.
Copy/paste the following into your htaccess file to set the correct Expires rules:
<IfModule mod_expires.c>
ExpiresActive on
    ExpiresDefault                              "access plus 1 month"

    ExpiresByType text/cache-manifest           "access plus 0 seconds"

    ExpiresByType text/html                     "access plus 0 seconds"

    ExpiresByType text/xml                      "access plus 0 seconds"
    ExpiresByType application/xml               "access plus 0 seconds"
    ExpiresByType application/json              "access plus 0 seconds"

    ExpiresByType application/rss+xml           "access plus 1 hour"
    ExpiresByType application/atom+xml          "access plus 1 hour"

    ExpiresByType image/x-icon                  "access plus 1 week"

    ExpiresByType image/gif                     "access plus 4 months"
    ExpiresByType image/png                     "access plus 4 months"
    ExpiresByType image/jpeg                    "access plus 4 months"
    ExpiresByType image/webp                    "access plus 4 months"
    ExpiresByType video/ogg                     "access plus 4 months"
    ExpiresByType audio/ogg                     "access plus 4 months"
    ExpiresByType video/mp4                     "access plus 4 months"
    ExpiresByType video/webm                    "access plus 4 months"
    ExpiresByType image/avif                    "access plus 4 months"
    ExpiresByType image/avif-sequence           "access plus 4 months"

    ExpiresByType text/x-component              "access plus 1 month"

    ExpiresByType font/ttf    "access plus 4 months"
    ExpiresByType font/otf    "access plus 4 months"
    ExpiresByType font/woff   "access plus 4 months"
    ExpiresByType font/woff2  "access plus 4 months"
    ExpiresByType image/svg+xml                 "access plus 4 months"
    ExpiresByType application/vnd.ms-fontobject "access plus 1 month"

    ExpiresByType text/css                      "access plus 1 year"
    ExpiresByType application/javascript        "access plus 1 year"
</IfModule>
Code language: PHP (php)
For these rules to be correctly applied, your server needs to have the mod_expires module activated. It will already be activated on the vast majority of webhosts .
NGINX
If your site is on an NGINX server and therefore without an htaccess file, you need your webhost or server admin to modify the server configuration and add the necessary rules.
You can ask them to add the following:
location ~* \.(css|js|ico|gif|jpe?g|png|svg|eot|otf|woff|woff2|ttf|ogg|webp)$ {
	expires 1y;
}
Troubleshooting
If you’ve followed the above steps but PageSpeed is still showing you a warning about the cache policy for your static assets, there are a few common issues you can check.
Check with your CDN
If you are using a CDN like BunnyCDN, Key CDN etc, to serve static assets, you may need to tweak your settings there. They may be using different cache expiration than what’s set at your host.
CDNs may also apply rules which can end up overriding what you set. So you either need to contact the CDN to have them adjust it, or see if they have a settings, something like “respect existing headers” which will take the rules set at your main server.
Cloudflare
If your site is on Cloudflare, you can adjust the Browser Cache TTL setting.
Go to: Caching → Configuration → Browser Cache TTL

Cache TTL is none

If the Cache TTL column lists “none” it means the server is not set up correctly and is likely missing the mod_expires module. You have to contact your webhost about this.
Cache TTL is different than expected
There’s a couple of reasons PageSpeed might detect a different value than the expected one.
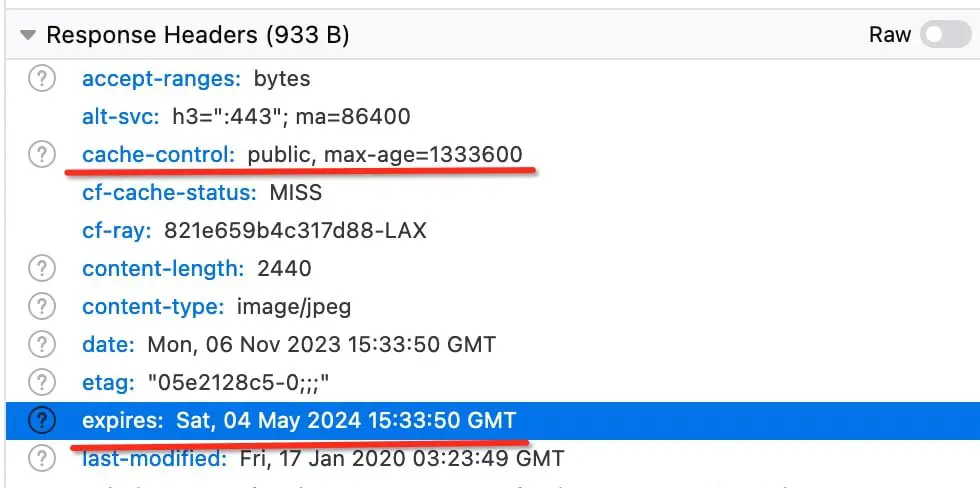
If you have both cache-control and expires values defined differently, the cache-control value will take precedence:

cache-control is defined in seconds. So max-age=1333600 gives a value of about 15 days, which is what PageSpeed sees for this asset:

Check your htaccess file, if you have different values defined for the same file type, the rule that is furthest down in the file will take precedence.
If you would like to understand more about browser caching in WordPress, read our guide.


